Archive for the ‘Garden design’ Category

A Perfect Food Garden

zanzibar crops-2

I was accompanying my husband on a business trip in Zanzibar, and having nothing to do in my air-conditioned hotel room,decided to engage a driver who could show me how the people of Zanzibar grew their food. I found a guide who spoke English reasonably well and tried to explain what I was after. He looked at me rather blankly……”Oh, you want the spice tour,” he said, and without further ado we set off in his car. I kept on demanding “food gardens” and he kept on insisting “spice tour” until eventually I gave up.

We arrived at a small farmstead, which consisted of a collection of huts surrounded by palm trees next to the potholed road. Here I was introduced to a young man who told me that he would be explaining the value of all the spices to me, adding that he was not officially a guide, but he needed to practice his English. “Where did he learn about the plants?” I asked, thinking that I would prefer to have an official guide. Noting my hesitation the “guide” flatly informed me that in Zanzibar you did not have to “learn about plants”. You just grew up with them, and that was sufficient.

So we set off into a forest of very beautiful trees interspersed with tall palms. First stop……a henna tree. “This is where the leaves have been harvested and you can see the new leaves coming,” our guide explained. “On the other side the tree looks very different: that is where the leave will be harvested from next time.” All around the henna tree were bunches of lemon grass. “The grass is collected and used fresh for making tea, or dried and bundled so that it can be burned and the smoke used as an insect repellent. The stems are collected for cooking, and for making a body lotion.” The guide’s English was excellent and I was becoming more and more interested. He pointed to another clump of plants next to the footpath, and laughingly asked me to guess what they were. Turmeric.  Again the many uses were explained – both culinary and medicinal.

zanzibar. palm tree 2The forest was refreshingly cool. The trees – clove, cinnamon, litchi, nutmeg and many others I did not recognise, cast a dappled shade, and here and there were small clearings with lemon grass, turmeric, ginger, cardamom and cassava. The forest floor was carpeted with leaves, old palm fronds, and coconut husks. Palm trees grew everywhere: some with creepers full of peppercorns waiting to be picked clinging to their trunks, whilst others supported creepers festooned with vanilla pods.

A farmer, together with a party of children arrived. There were greetings of “Jumbo” all round. The farmer asked if I would like something to drink, kicked off his shoes, grabbed a figure-of-eight shaped piece of rope and proceeded to climb up a coconut palm – at least three story’s high. “Hakuna matata – huh.” The farmer’s voice rang out as he climbed rhythmically up the palm’s stem. “Hakuna matata” the guide and the children shouted back, clapping their hands and dancing from side to side as the farmer climbed higher and higher. I would have loved to sing along, but since I didn’t know the words I had to be content with merely clapping to the rhythm. On reaching the top, the farmer pulled a sharp knife from his belt and hacked down some coconuts and a palm frond.

We relaxed in the sun while the coconuts were prepared: the husk is cut back and then the top lopped off with a sharp knife to form a cup containing coconut juice. We gratefully quenched our thirst – the juice was refreshing and delicious and quite unlike the taste of dried coconut that I was expecting. “Very good for cleaning the kidneys” the guide informed me. As each coconut was drained the farmer carved a spoon out of the coconut husk so that we could scoop out and eat the coconut flesh. What a feast!basket

In the meantime one of the children was weaving a most beautiful basket out of the coconut frond. As we finished each cocnut we simply threw the husks back into the forest. Mulch! The next tree was a litchi tree, and a young man obligingly harvested several handfuls which were put in the basket for me to take home.    The children were now fashioning jewelry out of palm fronds, and I gained several necklaces and a bracelet.

We reached an opening in the forest, and the farmer asked us if we would like to join him at his restaurant:  a shady tree furnished with simple benches.     The fare consisted of  lemons, oranges, star-fruit, guava, cocoa, custard apples, star apples, and jackfruit, one delicious mouthful after another, simply cut up with a very sharp knife, and  handed out piece by piece – no cutlery or crockery required.      At the end of this sumptuous meal we were brought a container of water and invited to wash our hands – over a chilli bush growing in the middle of the restaurant.

restuarant1

So, I had got my “food garden” experience after all.    Not only that, I had been thoroughly entertained, heard a beautiful song, and been given a perfect little basket and loads of jewelry.    I had learned a lot about spices, and had been part of a young man’s English lessons.  I had feasted on fruit in a beautiful restaurant, and felt good about the fact that not only did no-one have to clean up after me, but I had watered a chilli-bush whilst there.

Back at the hotel, with no forest to keep me cool, it was so hot that I had to jump into a cold shower and switch on the air conditioner.   Suddenly, my “civilized” world felt rather empty.

Kitchen Gardening for the soul

Kitchen gardens are not just places where you grow food to eat. A true kitchen garden is also about finding food for the soul. Kitchen gardens have traditionally also been healing gardens – full of culinary herbs, medicinal plants, and perfumed pleasures, as well as pretty flowers, all of which combine to create an uplifing sensory experience. The herbal spiral/labyrinth at Doonholm Nursery (which is unfortunately only open for public viewing once a year, for the HOASA Herbal Happening) is a perfect example of one such healing garden.

Herb spiral/labyrinth at Doonholm Nursery

Herb spiral/labyrinth at Doonholm Nursery

Unfortunately, this photograph cannot even begin to do the spiral justice. This masterpiece was designed by Louis van Aswegen of Healthy Living Herbs, The garden may not be open to the public, except on special occasions (such as the Herbal Association of South Africa Herbal Happening) but you can visit the Healthy Living Herbs website any time. Here you’ll find everything you ever wanted to know about herbs you can grow in your kitchen garden.

Back to the labyrinth. There are many reasons why walking a carefully designed labyrinth is such a healing experience – and why every individual who walks it will experience it differently. Some labyrinth walkers use the experience to meditate, some experience it as a form of prayer, and many simply think of it as a fun way to spend time. Walking this particular labyrinth gives you the opportunity to play with all your senses as you move through different coloured flowers and foliage, feel the different textures, try to pin down all the elusive perfumes, and steal the odd leaf here and there to taste. Birds and insects flit back and forth, and you are transported to another world.

Even if you don’t have enough space to build a labyrinth of your own, there is no reason why your own kitchen garden cannot become that special place where you not only pick food for the table, but also cultivate a little food for the soul.

(HOASA stands for the Herb Association of South Africa. For more information Visit www.haosa.co.za)

For more design ideas visit the following posts:

Trench gardening, double digging and raised beds

Raised bed designs

Raised bed designs

Those of you who have read the book Cultivating Flavour or my post Trench Gardening, Double Digging and Raised beds will know that I am a great fan of raised beds. And it seems that there are many other kitchen gardeners who agree that if you want to grow a productive, easy-to-maintain, kitchen garden, raised beds are your best option.

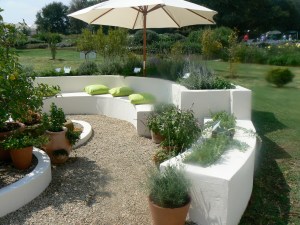
Entertainment area - Doonholm Herb Farm

Raised beds are not only easy to work with, they also give good drainage and can be used to create attractive garden features. I spotted the attractive patio garden photographed above at the recent HAOSA Herbal Happening at Doonholm Herb Farm. The garden – designed by Louis van Aswegan of Healthy Living Herbs – combines raised beds, plants in containers, and a seating area complete with umbrella and green cushions. Here you have everything you want from a kitchen garden: raised beds in which to grow your vegetables, a place for containers of herbs and companion plants, as well as an area where you can relax and enjoy the sunshine in a beautiful, environment.

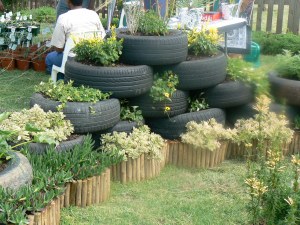
Tyre gardens - raised beds

Tyre gardens - raised beds

Don’t be discouraged if your building skills are not up to building a garden like the one above. Alongside is a photograph of raised beds build from old tyres. This particular garden made up part of the Arc-Roodeplaat Vegetable and Ornamental Plant Institute display at the HAOSA Herbal Happening. The staff mannng the stand assured me that they have had a lot of success with similar beds throughout Gauteng and the resounding areas. I must, however, confess that when we experimented with a tyre tower in which to grow potatoes in the garden at Lizard’s Leap, we didn’t get to harvest a single potato. Thinking back on this particular experiment, I think that the problem was that in our very hot climate the tyres got too hot, and so I ended up cooking the potatoes – before they’d had a chance to grow. Those of you who live in cooler climates may however be able to make use of the extra heat retained by the tyres to get the best out of succulents and other heat-loving plants. (Have a look at www.growsonyou.com/sandra/blog/1711-recyling-200-tyres.)

cultflav-page-121-raisedbeds11

Finally, I just had to show you this raised bed. Here we have a productive kitchen garden, growing alongside a boundary wall. The raised bed not only helps to soften the wall, but also lifts the plants out of the house’s shade. A stunning solution to what would otherwise be a rather bleak and unproductive area, don’t you think.

Have a look at the post Kitchen Gardening for the Soul – I’m sure you’ll be inspired.

Trench gardening, double digging and raised beds

Despite the fact that so few people practice trench gardening in southern Africa (and most of those that have, have given it up) this is probably the most written about gardening system in the region. Writing about trench gardening is obviously a lot easier that putting it into practice! (Ouch! I can almost feel you wince.) What’s more the recommended trench depth appears to be getting deeper and deeper and the last article I read on trench gardening was recommending trenches at least 1m deep.

Just so that you know what I’m talking about, the following directions are usually given for building a trench garden bed.

  • First dig a trench about 1m wide and 1m depth. Keep the topsoil and the subsoil seperate.
  • Next fill the trench with a layer of organic matter or rubbish to a depth of about 200mm and water well.
  • Add 50-100mm of subsoil, and again, water well.
  • Continue filling the trench with alternating layers of rubbish and soil until all the suboil is used, watering each layer well as you go along.
  • Finish with a layer of topsoil, raised above the original ground level.
  • The trench is now ready for planting.

The directions do not give any guidelines on how you should deal with the resulting backache or heat exhaustion.

There are several reasons – apart from the backache – why trench gardening is problematic.

Plant roots need air in order for the plants (especially vegetables) to grow well, and they are therefore unlikely to grow well in a water-logged soils. Trench gardens are problematic because they become prone to water logging, especially where they have been dug deeply enough to penetrate the subsoil. And, given the recommended depth, this is more than likely. Subsoil is not only rather compact and difficult to dig, it has a high clay contact. Water is therefore unlikely to drain readily out of the trench into the surrounding soil. To make matters worse, in very wet conditions, water may actually drain out of the surrounding subsoil and accumulate in the trench.

Burying organic matter in a trench is, moreover, an extremely wasteful practice. When organic matter is buried, the whole composting process and accompanying release of nutrients slows down because the micro-organisms responsible for this process no longer have enough air. Once the trench collects water, as will happen during the rainy season, the organic matter becomes waterlogged and you end up with a smelly mess rather than useful compost.

Another difficulty I have with this method is the fact that in the unlikely event that the deeply buried layers of organic matter actually break down and release nutrients, these nutrients would probably be too deep for the plants to access, given that most food crops do not send their roots down any deeper than 300mm. Rather a waste of organic matter, don’t you think?

Interestingly, if you build a trench garden you end up with a layer of top soil well above the original ground level. In other words you create a raised bed. Raised beds help to ensure that the soil is well drained, and the vegetables in your garden will grow well provided you can maintain that layer of soil above the original ground level high enough to accommodate the plant roots. Raised beds are also a joy to work with since you don’t have to do so much bending to tend to your plants. It is not however necessary to dig a meter deep trench in order to build a raised bed!

cultflav-page-120-cleopatrasraisedbeds3

There are any number of ways that one can go about building raised beds – it rather depends on what materials you have available. In the garden at Lizard’s Leap I used recycled concrete blocks to outline the beds and then filled them with compost and soil from the pathways. There are however other, far more attractive alternatives – railway sleepers immediately come to mind.  At Cleopatra’s Mountain Farm House the beds are edged with low brick walls, beautifully set out in a formal garden. In larger gardens, where space is not an issue, you need do no more than heap the soil and cover the sides with mulch.

Double digging is another system of soil preparation which is commonly recommended to new gardeners. In this system the gardener starts off by digging a trench, usually about 200mm deep and setting aside the soil. A second trench is then dug alongside, and this time the soil from the second trench is dumped into the first trench. Trench after trench is opened up and the soil from each trench is used to fill the preceding trench. Eventually the whole area has been dug over. The only possible reason I can think of for double digging, is perhaps to remove very large rocks which might impede root growth. The usual argument for double digging is that it aerates the soil. Unfortunately, with all this digging you run the risk of destrying the soil structure – especially if you are digging wet clay soil, in which case you are most probably going to end up with hard clods of very badly aerated soil. A far more effective and much easier way to aerate the soil is to cover it with a layer of mulch. In no time at all earthworms will move in under the mulch and aerate the soil for you.

For more information – and photographs – on raised beds visit the post Raised bed designs